 enEnglisch
C. Autofocus
All Nikon D7000 autofocus settings listed and explained on one page. In the end, they serve only one simple objective: to focus the lens at the moment of shutter release to the distance your subject needs. But there are remarkably many ways to achieve this.
The D7000's autofocus works differently when shooting through the viewfinder than in Live View mode, when you see a preview of the image on the monitor.
This section applies to shooting through the viewfinder.
Autofocus and manual focus
What | The autofocus must be switched on at the D7000 and at the lens, otherwise it is not active. Then you can only focus by turning the distance ring on the lens.

Where | The focus switch is quite far down on the front, for operation with the left thumb. AF for autofocus, M for manual focus.

Your lens probably has a switch labelled M/A or A and M. It must be set to A or M/A for autofocus to be active.
The M/A setting means that when the autofocus is on, you can intervene at any time by turning the distance ring. Then the autofocus is switched off until you tap the shutter release again.
Camera mode

Reminder: The camera mode is also important for the autofocus, only in the advanced camera modes P, S, A, M as well as U1, U2 you can use all the settings described in this chapter.
Starting Autofocus

The start signal for the autofocus to begin focusing is normally given by tapping the shutter button. In Nikon's standard settings for the D7000, this is the only way.


You can arrange that the AE-L/AF-L button on the back iniates the autofocus, in the custom settings menu by selecting .
Then the D7000 will not refocus when you tap the shutter button. This way you can focus at a certain distance, keep it unchanged and later release the shutter at the right moment without delay by refocusing.
Focus tracking

What | Focus tracking controls whether the autofocus stops once it can focus correctly or whether it continuously tracks moving subjects.
Where & How | You set the focus tracking with the autofocus button and the rear control dial. It is the round centre of the autofocus switch, not immediately recognisable as a button on its own. It is easy to use the autofocus button without taking the camera from your eye; symbols for the currently selected setting appear in the viewfinder:
- AF-A (automatic): The D7000 automatically decides whether autofocus will 'lock' after focus is achieved or continuously track for moving subjects.
The subject must be moving at the moment of focusing for the autofocus to switch to focus tracking.
- AF-S (single auto focus): The D7000 focuses once and does not change focus until you release the shutter button and press it again.
- AF-C (continuous auto focus): The D7000 continuously adjusts focus as long as you keep the shutter button pressed.
Focus point selection – where to put the focus?

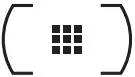
What | The D7000 has 39 autofocus sensors distributed over the centre of the frame. The focus point selection decides which of these are used to focus.
Where & How | You set the AF point control with the autofocus button and the front command dial.
AUTO: Automatic selection from all 39 points, most of the time the D7000 will focus on the foreground.
 or S in viewfinder: Single focus point − you select one sensor for focusing.
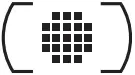
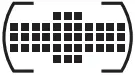 or d9 / d21 / d39 in viewfinder: Dynamic − You select a sensor for focusing and try to track your moving subject with it. If you lose it momentarily, the D7000 will use the surrounding focus points as supplementary. Not available with AF-S.
3D: You select the metering point for initial focus and the camera tracks your subject with all the metering points as it moves within the viewfinder. Not available with AF-S.
Choosing a focus point
What | With all AF focus point selection options except AUTO, it is up to you to select a point in the viewfinder for initial focusing. The D7000 has some subtleties in operation for this.

How & Where | The rules of the game for choosing a focus point are:
- You select a metering field with the arrow keys, a corresponding marker moves around in the viewfinder.
If this does not work, check the autofocus lock switch (see below).
- The OK button resets the selected focus point to the centre.
Additional subtleties are:

To move the focus point marker more quickly, you can reduce the selection from 39 to 11 in the custom settings menu . However, you will then not be able to move the focus point as precisely as before.

When a focus point at the very edge is marked, you can select a shortcut to jump to the opposite side: In the custom settings menu , change the default value to . Then another movement towards the edge makes the marking jump to the other side.

The marking of the selected measuring field is illuminated in black or red, depending on the background. In the custom settings menu you can always make it always glowing red or appearing black. However, I see no reason to change the reasonable standard setting with an automatic change.

The autofocus lock switch prevents the selected metering field from being changed when it is set to L as lock.

You can change the effect of the OK button in the custom settings menu so that it highlights the active AF point in red or does nothing at all.
Additional settings for static autofocus
The following settings apply to static autofocus AF-S and when automatic autofocus AF-A does not detect motion:

Beep | As soon as the autofocus is able to focus successfully, a beep sounds, unless you stop it in the custom settings menu . The signal also sounds when the self-timer is running. It can only be switched on and off for autofocus and self-timer at the same time.

AF-assist light | In low light, the D7000 switches on an assisting light for focusing when the focus point selection is AUTO or the central focus point is selected. You can turn it off in the custom settings menu if it bothers you.

Focus and release priority | Focus priority means that the D7000 only releases the shutter when the autofocus reports correct focus and, if necessary, delays the shot until then. With shutter priority, it will take a picture immediately regardless of the success of the autofocus. Focus priority is preset, but you can change it in the custom settings menu .
Additional settings for continuous autofocus
The following settings apply to continuous autofocus AF-C and when automatic autofocus AF-A detects motion:
Delay in reacting to sudden distance changes | ”Lock on“ is a short delay with which the continuous focus tracking AF-C reacts to abrupt changes in distance. It makes the autofocus a little slower, but prevents faulty reactions, e.g. if someone suddenly runs through the picture and corsses the active focus point. In the custom settings menu you can set this delay to be longer or shorter.

Focus and shutter priority | Unlike AF-S, continuous autofocus is preset to shutter priority and you can change this in the custom settings menu .
Autofocus lock
What | Autofocus lock means that the current focus is frozen and you can take pictures without any delay. The D7000 will not attempt to focus again while the autofocus lock is active.
Where & How | The autofocus lock is assigned to the AE-L/AF-L button in Nikon's default settings. AF-L stands for autofocus lock and AE-L stands for auto exposure lock − the exposure is also frozen, at least in Nikon's default settings.
To use autofocus lock
- press the shutter button lightly
- press the AE-L/AF-L button while keeping the shutter release half pressed
- compose the final image or wait for the perfect moment, then press the shutter button completely.
You can assign different behaviour to the AE-L/AF-L button in the custom settings menu .
Instead, you can assign the autofocus lock to the preview or Fn button on the front − if you select in the Individual functions menu or .
Autofocus fine tuning
What | It can happen to the sensitive autofocus system of an SLR camera that it is not precisely adjusted and constantly focuses a little too far or too close. That is called ”front focus“ or ”back focus“ and you can correct it in a camera menu.

Where & How | The system menu is responsible for this. There you can apply a smaller or larger correction to the autofocus for each lens on a scale from -20 to +20.
Recommendation | Be careful with this menu, use it only if you are sure that your D7000 permanently focuses too close or too far. Single out-of-focus photos are no reason to play around here and a wrong correction would be an aggravation. The best way to check the autofocus is to take a photo at a flat angle on a flat surface. There you can, for example, lay out a folding rule and compare whether the image is sharpest exactly where you focused or not.